
Do you want to give your followers an easy way to sign up for your email list directly from your Facebook page?
In this article learn how to add lead capture form directly to Facebook page to turn followers into subscribers!
I have tried various email marketing companies however the one that I particularly like is AWeber as I find their support to be excellent.
Aweber’s Facebook application will allow you to easily add a sign up form to a Facebook fan/business page. Due to the nature of personal Facebook profile pages it is not possible to add a sign up form to your personal page. If you do not yet have a Facebook fan/business page you can simply create one.
This article explains how to install a sign up form to your Facebook fan/business page through the AWeber app. The app would not be visible for mobile users; however, if you wanted to publish a form to your Facebook page so mobile visitors could sign themselves up, please click here for those instructions.
Watch A Video
Step by Step Instructions
First, be sure to be logged in to your Facebook account. Once logged in, click this link to add the AWeber app. After the page loads, click the “Add App to Page” button and log into your Facebook page.
Once there, choose the page you’d like to add the app to, then click “Add Page Tab.”
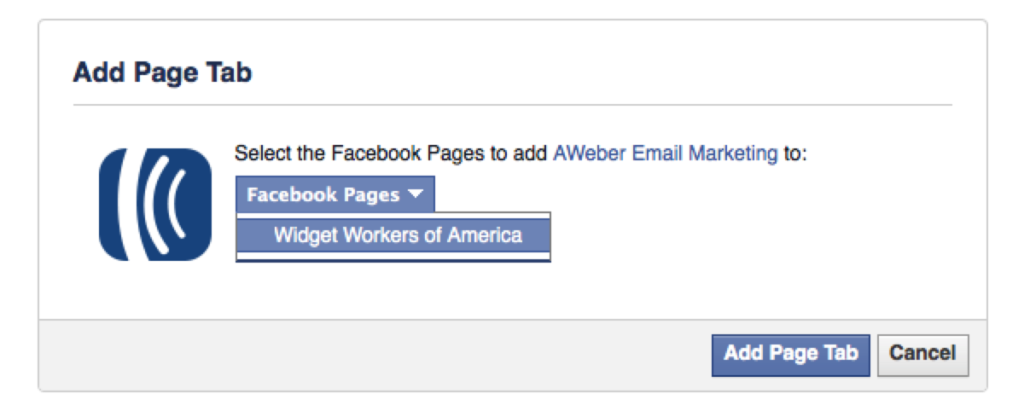
This will take you back to your profile home page in Facebook.
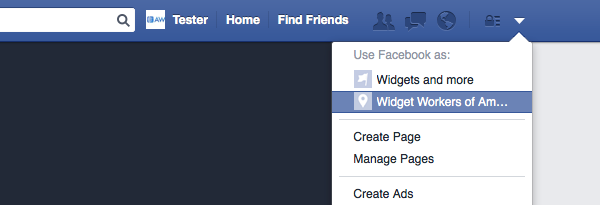
2. Next, you will want to click the down arrow in the top right corner of your Facebook account and select the page that you had installed the app onto.
3. On the next page find the “Email Signup” tab on the left side of the page and click on it.
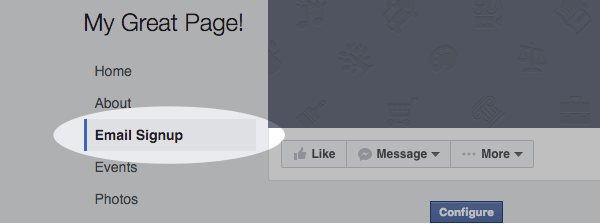
4. On the next page you will want to click the “Configure” button.

You will then be prompted to enter your AWeber login details in order to allow Facebook to connect to your AWeber account. After you have entered your AWeber login details press the “Allow Access” button.
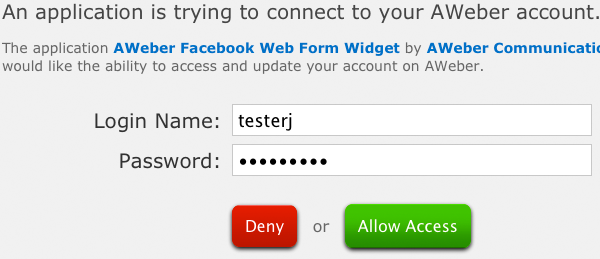
The page with the “Configure” button will then appear again. Press that “Configure” button again.

5. Next, choose the list you’d like to have subscribers added to:

And the form you’d like to appear:

Then click the “Save Changes” button to install your form!
Note: if you do not complete the above step then a form will not display when a subscriber clicks the “Email Newsletter” tab. Instead they will see a page that says “This Facebook tab has not been setup yet!”

6. To change the name of the tab where your form appears, click “Settings” from the upper right hand corner of the page.

On the next page, click on “Apps” from the options in the sidebar.

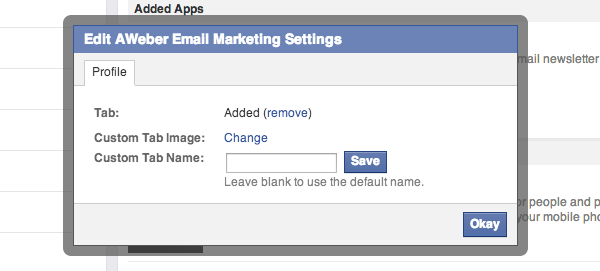
From the “Added Apps” section that appears click on the “Edit Settings” link underneath the “AWeber Email Marketing” app.

You will then see a pop up in which you can change the tab name from “Email Signup” to something different and the tab image from the default AWeber one to something else as well. If changing the Custom Tab Image, your image must be a .jpg, .gif, or .png file. The size of the image must be 111 x 74 pixels and the file size limit is 1 MB.
And that’s all there is to it. Now any visitor to your Facebook page can become a subscriber to your email campaign.
‘Til next time..
Sincerely,
Moni Arora


